Tar River SAYA-507 No Till Drill

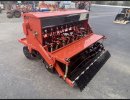
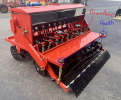
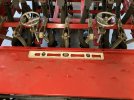
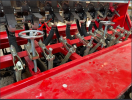
You have to keep the handwheel heights almost balanced. Both handwheels are rotating that 2" square toolbar that all of the disk opener rod/tension springs are clamped to, and if one is too far ahead of the other the toolbar binds and and its REALLY hard to move it. I think I adjust about 5 turns on one then go to the other for 5 turns then back again. When you have it balanced both turn easy. The threads are the key, not the unthreaded portion you are looking at on the bottom of the threaded rod. My handwheel brackets were clamped to the toolbar wrong, that may be your problem. Text me a pic of the handwheels and brackets at 843-870-4606.

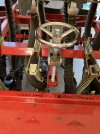
On the basket handwheels I stick a longhandled screwdriver across and through the handle ,then place the screwdriver shaft against the handle shaft and you can spin the handle till the cows come home.
 
Thanks for the advice! I'll text you some pictures. It will be tomorrow at the earliest. Thanks buddy!
 
I put four 75 lb cast iron weights on my front trays and no weight on the back (for those of you from Kentucky that adds up to 300 lbs....grin). I am really not sure if I needed any weight on my machine as my soils are pretty light and I penetrated everything I tried it on. I zip tied the suitcase weights to the weight tray....but probably will do something more substantial at some point. I never saw an issue with the basket (drum) rotating.....but I always wondered which way to turn those hand wheels.

Will clockwise provide more penetration of the openers? or visa versa??

Mine seems to run about an inch of depth (more or less depending on my top link) and for most of my purposes that seems about right.

Has anyone changed the pin settings on those down pressure springs? They may afford some help in hard ground......no?? I assume that spring tension provides the "pre-load" on the openers. But none of this has been explained well......IMO.
 
Last edited:
CCW lowers the disc openers for more penetration. I moved the pin on my seed openers to add spring pressure. My land is not smooth as a babies butt and adding pressure seems to help when traversing small dips and divots.
 
CCW lowers the disc openers for more penetration. I moved the pin on my seed openers to add spring pressure. My land is not smooth as a babies butt and adding pressure seems to help when traversing small dips and divots.
Who / What is CCW?

EDIT: OH.....Counter Clock Wise! Duh. So rotating the wheels Counter Clock Wise will serve to get deeper openers. Thanks.....got it. I remember using a sharpie marker on my drill last year with an arrow and I was prepared to write deeper on one direction or the other.....but never could tell what I was achieving......and I was getting the right dept......so I just kept on going and let good enough alone.

I just finished watching a you tube video that just was published two days ago. The guy was planting corn.....and it was less then 1/4 " deep at the deepest and most was on top of the ground. He seemed happy......I would be livid. We gotta figure out depth control issues this year and someone should do a video on how to adjust this drill for depth. I'd buy the popcorn. ;)
 
Last edited:
Rotate the two handles Counter Clock Wise (CCW) to lower the disc openers.
 
Did not get to my land in the past week. Took my wife today....and wanted to see if my rye was taking off. It is.....and it's now from 15" to 24" high and growing like a house afire. We got 2.5" of rain in my gauge in the past week and everything is turning green fast. Kinda late this year....but that is fine with me as I have been sidetracked anyway. Got my drag chains yesterday....and just placed one on the drill to look at how they may be affixed.

Didn't have much time to look at other things....but I did have my rear walk board removed so I could attach more of those small seed box drop tubes behind the openers. Thought I would take a pic of the depth cranks and spring adjustment as we been talking about those things....and it gets hard to relate without a pic.

IMG_0216.JPGIMG_0217.JPGIMG_0214.JPGIMG_0212.JPGIMG_0214.JPG
 
I noticed in older Tar River Youtube videos the drills had a roller on the rear instead of the spring loaded fingers. I think I would rather have the roller. It must have been cheaper to produce the fingers.

Foggy your field looks great. Did you till or no till? I tried to re plant my soybeans today but my field is to wet. I did spring for the wavy coulters and probably find out if they improve the drill on monday.

I noticed your finger bar is installed on the bottom of the mounting bracket and mine is installed on the top.
 
I nuked what was basically burned up by the drought.....and no tilled into some pretty bare soils. The rye came in pretty good and I did have some brassica (PTT/ DER/ GHR/Collards) develop "ok" last fall....but the small seeds could have been far better. I also put down some clover.....and it appears that is coming along pretty well in some areas and not so much in others. The winter rye seems pretty consistent throughout the ten acres I planted.....and gives me a start with suppressing weeds and building some armor on the soil. Hoping I can accomplish more this season.

The Tar River conventional drills (not no till theoretically) have a cultipacker on the back instead of the flaps.....so I assume you could swap this lightweight cultipacker with the flaps. I think the flaps do "ok" for me....but there is allot of room for improvement. I bought 7 of those chains shown for $50 plus shipping. I hope they will (1) keep the flaps mostly level with the ground and (2) provide some cover or packing on the light seeds. I uncertain how they are going to work in thick rye.....but I aim to find out. ;)

There is a guy in Michigan who bought a conventional Tar River drill.....and has used it as a no-till with some success....for a year or more. Not sure how he will do as he builds more bio-mass to plant into....but he seems to have a plan? He's on the right course. Nice guy. Good video. Check him out on you tube on "the back 40".
 
My Kasco is a min till and has a cultipacker on back but it doesn't cover seed either,I drag chain link fence over to cover.This is a John Deere area rake but more what they need or use packer wheels
tr3-eseries-7-375x375.jpg
 
A dealer is setting up the closing plates on his drills this way. Makes more sense. Haven't tried it yet as to wet but I will.
 

Attachments

  • Saya no till 507.jpeg
    Saya no till 507.jpeg
    429.7 KB · Views: 66
A dealer is setting up the closing plates on his drills this way. Makes more sense. Haven't tried it yet as to wet but I will.
Hmmmm....may have an improvement there. I am going to take my drag chains off. My cover plates are a little bent after a few acres.....and the chains will likely destroy them if I leave them on. If there were a better way to attach them I may use them again. I also had worries about them getting into that rolling basket....but that never happened........tho it could if attached directly to that tube the closing plated attach to. I like the pic above.....could be a solution? Please post your experience with this?
 
Foggy, have you considered adding these Keeton seed formers directly to the planting coulter? Seems like an easy cheap way to let seed down into the trench.

 
Great post - I have a question for clarity... Do the silver hand wheels set the depth? Or do the Black Hand wheels set the depth. I thought the silver wheels essentially set the down pressure by rotating the torsion bar, and the black hand wheels which control the basket height essentially set the overall depth... The black hand wheels essentially lift the basket up off the ground allowing all of the opening blades to drop deeper into the soil. While the silver hand wheels set down-force to ensure the coulters are always staying in contact with the soil. Do others have a different understanding? Also, are you essentially adjusting the top link so it is loose?

Planted some corn last weekend and getting ready to do Egyptian Wheat and a Buffalo blend this weekend if all goes well. Appreciate this post and all of the great insight.
 

Attachments

  • Capture.PNG
    Capture.PNG
    1.4 MB · Views: 42
Last edited:
Great post - I have a question for clarity... Do the silver hand wheels set the depth? Or do the Black Hand wheels set the depth. I thought the silver wheels essentially set the down pressure by rotating the torsion bar, and the black hand wheels which control the basket height essentially set the overall depth... The black hand wheels essentially lift the basket up off the ground allowing all of the opening blades to drop deeper into the soil. While the silver hand wheels set down-force to ensure the coulters are always staying in contact with the soil. Do others have a different understanding? Also, are you essentially adjusting the top link so it is loose?

Planted some corn last weekend and getting ready to do Egyptian Wheat and a Buffalo blend this weekend if all goes well. Appreciate this post and all of the great insight.
I spent considerable time today with this very issue. The silver (chrome) wheels have a major effect on the relationship of the depth of the openers....as it relates to the front counters (IMO). I had my SAYA on a level concrete floor and after carelully making a few basic leveling adjustments via the top link and the draft link on the tractor.....I had everything quite equal. (I was pretty close from the prior day.). I think turned those silver wheels counter clockwise to get more engagement with the ground as compared to the basket and the front sliceing coulters. I have some pics I will try to add to this post in a few minutes. Adjusting this drill is a bit of smoke and mirrors. I get better at it every time plant.....but it is a challenge.
 

Attachments

  • IMG_0303.JPG
    IMG_0303.JPG
    319.3 KB · Views: 42
  • IMG_0304.JPG
    IMG_0304.JPG
    320.2 KB · Views: 39
  • IMG_0304.JPG
    IMG_0304.JPG
    320.2 KB · Views: 39
Well it dried enough I got out and planted and sprayed everything this weekend. 3 different diverse mixes that I tried to plant from 30-50 lbs/acre.

Initially I had seed openers too high, then my basket too high, not enough weight… I got a little help from ACCMan and figured things out! I lowered my seed openers substantially and set the basket back. I have about 5” of thread showing below the opener turn wheels, I found that to work great. I also added 250ish pounds of sand and rock to the front. I ran it on “float” position. I was in every kind of black soil right up to pure mud, that didn’t work well. Otherwise it planted and covered in everything very well.

Also, I planted through standing rye and had zero issues with any wrapping or clogging the openers or basket, none!

Overall it went great and I’m excited about how good it worked!
2301817A-3A47-4DE3-B118-C4BD7EE308C9.jpeg1F249B50-74EF-4129-8B88-252D59DAD27A.jpeg4965C7AC-55B2-4BE0-A67D-DB833930B4C3.jpeg564A81A4-F4DA-40B4-8DD3-BDBE5D6CD3CE.jpeg6F5B0077-BBE9-435C-BEB2-790FE760E55F.jpeg0FFB40CD-EAF5-4566-AAC7-471269D8746A.jpeg0418C910-20AF-4EA7-94A3-3EED28C38FFE.jpeg
 
I’ll add, I’m not seeing much of a problem with coverage. I have some thatch on the ground and weeds and rye…. The roller basket really gets throwing things around! IMO it seems that has more to do with it than the chincy flaps. Did my small seeds get buried too deep? I don’t think so. Time will tell here if that’s an issue.

After I drove through I thought it looked like a well prepared seed bed and the troughs were covered (unless it was real dry and crusted). I know the striped gophers weren’t happy.
 
I am happily surprised by the operation of the rolling basket in standing rye. I never experienced wrapping of any kind. I was quite concerned about that....and the operation exceeded my expectations. Figuring out how to set it up or alter the set up is the biggest challenge. I have not yet used my rear (small ) seed box with my modified drop tubes....as so far I have seeded blends and large seeds. More to come in the next days.

I see more "big ag" machines are using that rolling basket concept as well for smoothing a seed bed. It does seem to work well. I operate at speeds in the 3 to 3.5 MPH area.
 
We were able to plant this weekend as well, it seemed to do ok where there was a bit of moisture the drill would cut in decent.

I would stay I am still having issues with getting the openers adjusted. These 2 adjustments will just bind solid, no matter what we do... as they were bound up and could not turn, here is what I did. I set the drill so all the openers were setting on the ground.... No load on the torsion bar. We loosened the bracket bolts so the threaded rod would turn freely. We then set the adjustment so it was equal on both sides. i.e. the threaded rod had the same height from the turning wheel to the threaded captured nut. We then turn them 1 turn at a time, simultaneously with the drill now lifted up in the air as to lower the openers.. Even doing this, the left side would bind 100% tight. Again this is with moving them together 1 rotation at a time. it bound so tight the only way to move it was to again loosen the bolts on the torsion bar and start over. We did this again, to set it as deep as we could go, but it eventually bound again. We left it and planted... For the most part it buried the see okay, however we had a lot of soybeans on top of the ground... Frustrated to say the least - only hoping the 2 tenths rain and more to come today and tomorrow help.... Unsure at this point if I will be a long term owner of the Saya.. It was supposed to increase efficiency and I spent most of the day making adjustments.. Maybe got 3.5 acres planted.. If I'm really going to up my game to 10+ acres I might have to bite the bullet on a different drill. I really wanted this one to work... we'll see what the results are.

If there are any tips on adjustments that I am blatantly missing - I would greatly appreciate the insight.
 

Attachments

  • Capture2.PNG
    Capture2.PNG
    1 MB · Views: 45
We were able to plant this weekend as well, it seemed to do ok where there was a bit of moisture the drill would cut in decent.

I would stay I am still having issues with getting the openers adjusted. These 2 adjustments will just bind solid, no matter what we do... as they were bound up and could not turn, here is what I did. I set the drill so all the openers were setting on the ground.... No load on the torsion bar. We loosened the bracket bolts so the threaded rod would turn freely. We then set the adjustment so it was equal on both sides. i.e. the threaded rod had the same height from the turning wheel to the threaded captured nut. We then turn them 1 turn at a time, simultaneously with the drill now lifted up in the air as to lower the openers.. Even doing this, the left side would bind 100% tight. Again this is with moving them together 1 rotation at a time. it bound so tight the only way to move it was to again loosen the bolts on the torsion bar and start over. We did this again, to set it as deep as we could go, but it eventually bound again. We left it and planted... For the most part it buried the see okay, however we had a lot of soybeans on top of the ground... Frustrated to say the least - only hoping the 2 tenths rain and more to come today and tomorrow help.... Unsure at this point if I will be a long term owner of the Saya.. It was supposed to increase efficiency and I spent most of the day making adjustments.. Maybe got 3.5 acres planted.. If I'm really going to up my game to 10+ acres I might have to bite the bullet on a different drill. I really wanted this one to work... we'll see what the results are.

If there are any tips on adjustments that I am blatantly missing - I would greatly appreciate the insight.
I can only turn one wheel about 3 to 6 revolutions before having to turn the other.....and just keep going back and forth. If you are "bottomed out" with the openers resting on the floor....I doubt you would have the strength to turn those wheels? <----migh be your issue? Mine has nearly the same threads exposed between the bottom of those wheels and the nut as yours. I'd guess 2/3rds of my thread is exposed under each wheel. Have you added some weight? Perhaps adjusting the bracket that holds the nut will allow better operation? Oil?

Edited to correct.
 
Top