Dukslayr
5 year old buck +
A big shout out to Swampcat for helping me answer a lot of questions on the way to ultimately buying a Woods PSS84. I’ve gone around and around with what I wanted to buy for planting needs. I was leaning towards a GP 606NT to handle my planting needs, which are 14-15 acres of row crops, a couple miles of annual screens, some miller, and then various mixes and clover. I am moving up from planting 1 acre of food plots to nearly 20 acres, which I learned this year is a reasonably large undertaking, particularly if you’re short on time, live more then an hour away, don’t own the right equipment and the weather doesn’t cooperate. Fortunately I found a friendly local farmer to plant my 15 acres of row crops (9 beans and 6 sunflowers) for a very reasonable price. This farmer lives 2 miles away and has everything needed to handle my row crops quickly and easily. After my experience this year I decided to give it a few years before I invest in a high quality no till drill...see how the row crops hold up and what I future needs are after experimenting for a few years. In the meantime I’ll have access to someone who’s happy to do my custom planting.
That being said I still have a number or other smaller plots that need planting on my farm and a buddies and after a lot of research ended up with a Woods PSS84. Not knowing anything about farming I was curious how complicated it would be to figure out operate. Fortunately it’s actually straightforward and didn’t take long at all to figure out. I just planted an acre of white poroso millet as a test run and here are a few takeaways for anyone looking at this model.
1. It’s pretty big, heavy and I’m general appears to be very constructed. I’m glad I got the 8’ model as it covers the rear tracks of my 75 HP Massey.
2. Engaging and disengaging the seed boxes is a little more of a pain in the ass than I had hoped. You have to remove a number (6-7 I think) of plastic knobbed bolts to remove the guards and access the gears. Getting the gears disengaged is easy...just pull the pin. Reengaging is a little trickier because you’ve got to realign the gear with the hole on the shaft and then sneak the pins back in. I’m sure it’ll be easier the more I do it.
3. Calibrating for seed was surprisingly simple. In essence you open up the seed meter to what you guess is accurate for your seed size and rate, then crank a handle 11 times and measure what comes out and with a quick calculation you open or close the seed gate. Took about 10 minutes using the instructions the first time today. I think I’ll be able to get it calibrated for almost anything in about 5 minutes in the future.
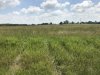
4. With a little soil moisture I’m confident you could one pass plant most things in a field that’s been previously cultivated. The acre I planted was a fescue pasture/yard of an old farm house I recently removed. The ground has probably never been turned. I prepped the ground by mowing short, letting it sit a week and then making a pass over it with my tiller. It sat another week and I planted it today.
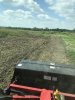
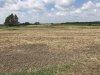
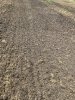
5. Seeder does a great job of metering seed, pulverizing and finishing a seed bed with the spiked roller and heavy cultipacker. For the small millet seed I chose to place it right in front of the cultipacker...most of the seed still got easily pushed into the dirt. See pictures below. By the time I planted the tilled ground was rock hard (not ideal but I’m out of time).
When I finished planting I had very little seed left, which was a good sign. The seeder seems to do a nice job at metering. I’m looking forward to trying some larger seeds and mixes too. Having two seed boxes will be very handy I think. Now I need some more of that rain that I couldn’t get to stop this spring...but as usual we can’t get a drop when we need it!
Few pictures below the grown up field before mowing and tilling it (didn’t kill it with any herbicides), the machine in action and a few of what it looked like post planting.
That being said I still have a number or other smaller plots that need planting on my farm and a buddies and after a lot of research ended up with a Woods PSS84. Not knowing anything about farming I was curious how complicated it would be to figure out operate. Fortunately it’s actually straightforward and didn’t take long at all to figure out. I just planted an acre of white poroso millet as a test run and here are a few takeaways for anyone looking at this model.
1. It’s pretty big, heavy and I’m general appears to be very constructed. I’m glad I got the 8’ model as it covers the rear tracks of my 75 HP Massey.
2. Engaging and disengaging the seed boxes is a little more of a pain in the ass than I had hoped. You have to remove a number (6-7 I think) of plastic knobbed bolts to remove the guards and access the gears. Getting the gears disengaged is easy...just pull the pin. Reengaging is a little trickier because you’ve got to realign the gear with the hole on the shaft and then sneak the pins back in. I’m sure it’ll be easier the more I do it.
3. Calibrating for seed was surprisingly simple. In essence you open up the seed meter to what you guess is accurate for your seed size and rate, then crank a handle 11 times and measure what comes out and with a quick calculation you open or close the seed gate. Took about 10 minutes using the instructions the first time today. I think I’ll be able to get it calibrated for almost anything in about 5 minutes in the future.
4. With a little soil moisture I’m confident you could one pass plant most things in a field that’s been previously cultivated. The acre I planted was a fescue pasture/yard of an old farm house I recently removed. The ground has probably never been turned. I prepped the ground by mowing short, letting it sit a week and then making a pass over it with my tiller. It sat another week and I planted it today.
5. Seeder does a great job of metering seed, pulverizing and finishing a seed bed with the spiked roller and heavy cultipacker. For the small millet seed I chose to place it right in front of the cultipacker...most of the seed still got easily pushed into the dirt. See pictures below. By the time I planted the tilled ground was rock hard (not ideal but I’m out of time).
When I finished planting I had very little seed left, which was a good sign. The seeder seems to do a nice job at metering. I’m looking forward to trying some larger seeds and mixes too. Having two seed boxes will be very handy I think. Now I need some more of that rain that I couldn’t get to stop this spring...but as usual we can’t get a drop when we need it!
Few pictures below the grown up field before mowing and tilling it (didn’t kill it with any herbicides), the machine in action and a few of what it looked like post planting.
Attachments
-
 16D1BB38-9A25-4106-A931-6C4BDD969F3B.jpeg429.7 KB · Views: 66
 -
 D8D5121A-B4DA-4415-9170-CF1BC6BDB5ED.jpeg663 KB · Views: 62
 -
 EEF83620-900C-4855-9AB2-26802FBDBFEF.jpeg913.7 KB · Views: 55
 -
 4EA0B2F4-DA44-4328-80CB-EC03289EFC1F.jpeg1,013.7 KB · Views: 62
 -
 AE27F18B-9CA9-46D9-A4EE-E5888054AC0A.jpeg617.4 KB · Views: 60

