Indoor Greenhouse Approaches - Transferred from QDMA forum

yoderjac

5 year old buck +
It is getting to be the time of year when new folks are starting to ask about constructing indoor greenhouses to start trees from nuts and seeds over the winter. I thought I'd start a new thread for the topic. The general concept is simple. We cold stratify any nuts or seeds that require it and then we germinate them over the winter and get them started under lights in containers. Once the last chance of frost passes, we acclimate the seedlings to the outdoors. From there, we can either plant them in the field or keep them in containers for the summer and plant them when they go dormant, or even keep them in containers for a second year.
The first issue to address is the containers. The problem with growing trees in containers is that most trees put a lot of energy into developing a tap root. This helps ensure the trees survival in nature if it encounters surface drought. The long tap root allows at least some access to the water table. In order to improve this chance of survival the tree sacrifices potential growth.
When we grow trees in containers, this tap root, and eventually other roots become a problem. When they hit the sides of a smooth sided container, they tend to either circle or J-hook. You can end up with a plant with a long twisted tap root. Roots are designed to avoid objects like rocks and in a container, they just keep growing trying to go around the object. While the tree may look find and grow when it is young, root circling and j-hooking can become a significant problem in the later life of the tree. Some folks resolve this by trying to use large containers to start and then pruning the roots by hand before planting. This may salvage the tree but a lot of growth is lost by expending energy on growing roots that are lost. Then more growth is lost as the tree tries to recover from transplant shock in the field.
The best solution I've found to this is root pruning container systems. There are a number of these on the market. The one I use and like best is rootmaker. So, my indoor growing setup is based around these. There are several kinds of root pruning containers. Good air pruning containers are designed with irregular shaped sides that force roots to grow to an opening in the side or bottom of the container. When a root tip (regardless of size) hits air, it desiccates and terminates the root. This forces root branching. Root trapping bags are lined with a fabric that captures the tiny root ends as they grow. This has the same effect of terminating the root and causing root branching. In my experience, these don't work well with large tap roots. They are generally used after the tap root has been air pruned in a smaller container. The third kind of root pruning container works through root constriction. This type is generally used outdoors in the soil, not indoors. It allows small roots to grow through them but then constricts the root as it grows in girth. This constriction again causes root branching.
One last word on root pruning containers. It is the tiny root tips that extract most of the water an nutrients. Since the tap root is pruned early in a good root pruning system, root branching starts very early. Instead of energy going into a long tap root, it goes in to root branching which collects much more water an nutrients (provided you make them available) which in turn makes more top growth. The key is that there needs to be water and nutrition available where the root systems is located. So, if you are in a drought prone area with a deep water table, if you can't provide supplemental water until your trees are well established, you may be better off direct seeding in spring or fall depending on the tree type.
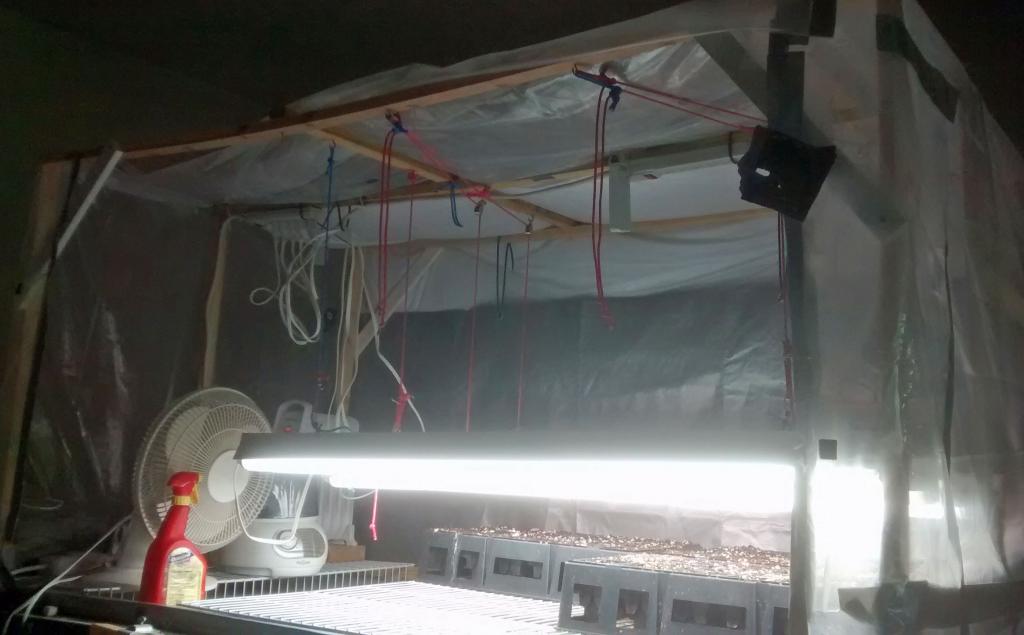
On to enclosures. The purpose of an enclosure is to try to hold the heat and humidity at good levels to maximize growth. My first enclosure is shown in this picture:
a6f200fa-b6e3-43d0-9163-e685b49af39e.jpg

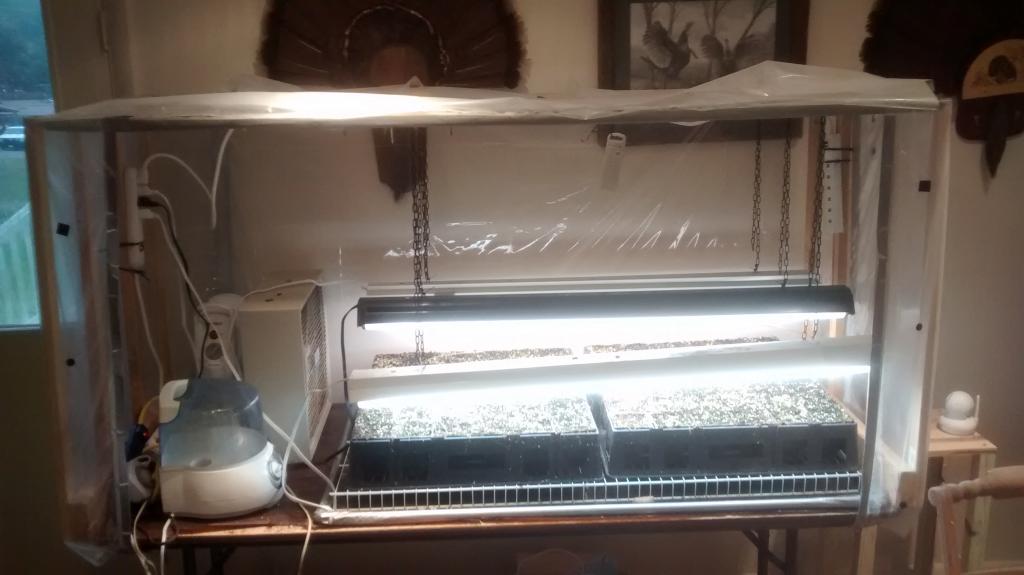
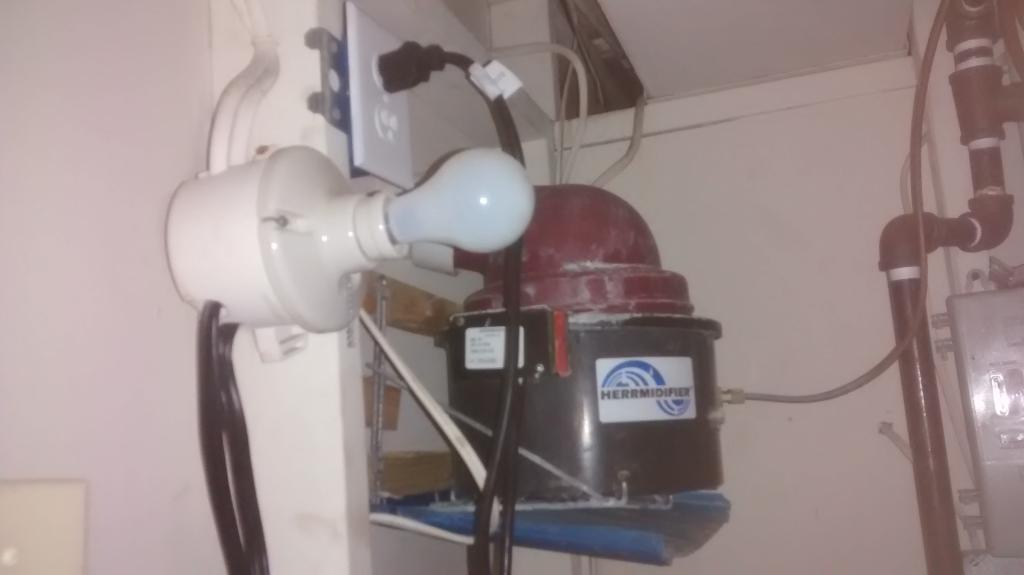
It is constructed from a simple wooden frame and shower curtains. The front is open in the picture but the shower curtain sitting on top folds down and Velcro is used to keep it fairly tight. It is designed to hold 4 rootmaker 18 express trays. Notice they are sitting on wire shelving material I got from Lowes. This elevates them an inch or so with good air flow below. They are sitting in another small frame (this one is PVC) with a shower curtain as a bottom. This "tray" collects water that runs through the cells when they are watered. I find it is better drench the cells so water is dripping out of all the holes. They are so well drained using a good mix like Promix or Fafard, you can't water them too much...just too often. I also place a small mosquito ring in the tray so any standing water does not invite insects. Also not the frame is large enough to accommodate a small fan, single room humidifier, and oil filled electric heater. I also got a remote weather monitor. I hang the remote inside the frame so I can monitor the temperature and humidity inside the unit from my living quarters upstairs.
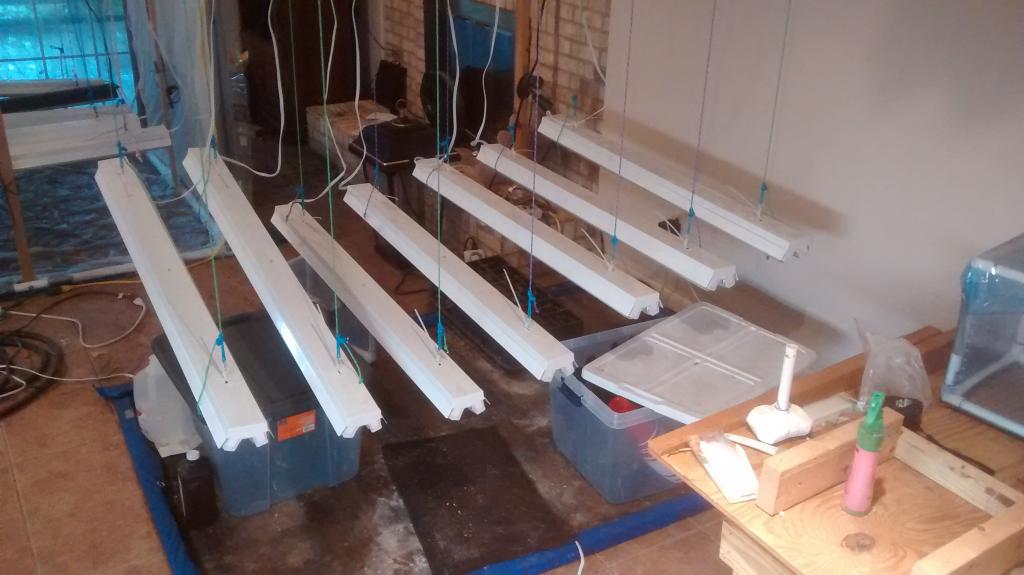
I used inexpensive florescent shop lights with a variety of inexpensive bulbs. The amount of light is much more important than the color of light. Remember, you will only have these trees indoors for a very short portion of their lives. They will get full spectrum light as soon as spring comes. The amount of light output is expressed in lumens, but there is more too it. Many non-fluorescent grow lights are expensive and put out a lot of heat. The light energy available to the plant decreases with the distance from the source squared. If you buy a hot bulb, you have to place it further from the plant or you can get leaf burn and wilt. So, a light putting out more lumens but places further from the tree may make less light energy available to the tree than a lower lumen bulb that is cooler and can be placed closer. This is why I like fluorescents. The key is having a system that allows you to adjust the height of the lights.
Notice in the picture above, my first indoor greenhouse, I only have 3 shop light (2 bulbs each). They are hung with the chains that came with them. Since this greenhouse is only two express trays deep, I can easily reach to the back to adjust the lights....
 
Last edited:
Rally1148;735153 said:
Great thread!
Thanks!
 
My second indoor greenhouse is shown here:
6447fc27-6ca8-46b0-b961-1be74e66f902.jpg

This one accommodates 2 express trays wide but 3 deep. That makes it too awkward to reach to rear to adjust the lights. You really need to lift the lights each time you water once trees are growing. So, these are hung by cords with small pulleys attached to the top of the frame and run to the top front of the frame where they are attached to cut hooks using prussic knots. Prussic knots allow the cords to slide through them to any arbitrary height I wish.
I adjust my light height using the feature of the express trays. They allow you to easily remove cells and reorganize your trees. Some with germinate quickly and grow quickly and others more slowly. I organize my trees by height so I can adjust each light individually.
Also notice that this greenhouse has more lights per express tray. I decided I wanted more lumens. I do get slightly better growth in this unit than the first one.
Most trees should be transplanted from a rootmaker cell to a larger container in 12 to 16 weeks. So, depending on when you start your trees and when your last threat of frost is, you may want to transplant into larger containers. Chestnuts grow tall fast and the greenhouses I created above are great for express trays but don't allow enough height for light adjustment to accommodate larger containers.
...
 
Last edited:
So the next indoor green house I build for larger containers:
540952cf-390b-45a0-ae68-5ba97305a5f7.jpg

The frame on this one is PVC and again I used shower curtains. Notice the add-on under the blue tarp on the left is where my heater, humidifier, and fan were located. These lights are hung like the previous ones with direct sliding prussic knots on the end lights and the pulley system for the interior lights. Since my basement has a tile floor over a cement slab, I bought interlocking anti-fatigue mats from Harbor Freight to line the floor. This insulates the plants from the cold floor.
....
 
Last edited:
Next, I decided to expand further and use the whole basement. The only way to get enough humidity was to use a whole house humidifier:
3484bdc0-7c66-45e8-9119-0ee876a23bdb.jpg

Normally these atomizing humidifiers are setup to discharge the humidity into your duct system and are tied to your furnace fan to they only produce humidity when the fan is on to distribute it through your house. It is directly tied into the plumbing so you don't ever need to fill it.
Instead, I set mine up to discharge directly into the basement through my utility room wall:
55cdf366-edab-46fe-ac1d-0126fff536f6.jpg

I had to place a rotating fan on the floor aimed at it to distribute the humidity through the basement better. Otherwise it condensed on the PVC output pipe and dripped on the floor.
.....
 
Last edited:
Once I had the humidity I needed in the basement, I could use much simpler setup. Here was the next one:
1d9f671e-300d-4997-a7c6-95a2939472ff.jpg

It is simply a wooden frame with a tarp stapled to it lined with the interlocking anti-fatigue mats. The lights again are hung using prussic knots from the ceiling.
My next expansion leveraged some of my DIY air pruning containers: http://www.qdma.com/forums/showthread.php?t=57658
They are built to hand from wires. I build small tables with wires spaced at the right distance to hold these. I can use them that way or put 2x2s across them to hold express trays, or put a piece of plywood on them for a solid work surface. I can also remove the tables all together if I need more room for larger container trees.
6cdce889-8c29-43a7-986c-5a96e40440cb.jpg

....
 
Last edited:
The last thing to talk about but an important one is water. I started out using city water but ran into trouble. It is generally pH adjusted and that process ends up putting salts into it. Since most of my trees like acidic conditions and most of the professional mixes are pH adjusted to neutral, I found the best solution is to water with rain water. No salts and it is naturally acidic.
I simply washed out two 30 gal drums from previous gly purchases.
dc1b9008-d5d4-4800-964e-4a98b856e075.jpg

I collect rain water in 5 gal buckets from my roof and pour them into the 30 gal drums. In the winter, I shovel snow into 5 gal buckets, bring it in and let it melt.
Notice the 5 gal buckets sitting on the drums. They have a 1" PVC pipe epoxied to the bottom which goes into the 2" hole in the top of each drum. the act a large funnels for filling the drums and sit there permanently. The wooden dowel rods you see sticking up from them have Styrofoam floats on the bottom and act as fill gages for me.
I use a simple transfer pump with a hose and wand for watering.
31563f58-f9ef-4453-9659-9d28e048af80.jpg

Well... I think that is about it....
Thanks,
Jack
 
Last edited:
Rally1148;735200 said:
You must have read my mind.
I was looking at some of my seedlings today and they still haven't greened up fully. I decided that it might be the water that I'm using, which like you, is city water. So I flushed them with some water that I have had sitting out for a few days. Now they're wet, but hopefully happier!

Thanks for all of this info!
 
beau_cephus;735411 said:
Have any of you tried using the black and white sun film? I have my frame built for my grow room in the basement and will be buying the remaining supplies to finish it off at the end of the month. Just wondering if the extra reflective light makes a difference.
http://www.hydroponics.net/i/139082
No, I have not used it. I know guys who have used the standard Mylar. Mylar is very reflective and lets you make more efficient use of the light you produce. I took a look at it and decided that it was not worth the added cost. Many of these techniques are used for growing systems for plants that spend their entire lives in the system. In our case a tiny fraction of the trees life is spent under lights.
Mylar, reflective white paint, or specialty products like the one you point out will not hurt your efforts at all. The question is simply whether any benefit they might provide is worth the cost. It wasn't for me, but others may choose differently.
 
beau_cephus;737140 said:
I've got my grow room up and running, what is optimal temp and humidity to germinate acorns?
First, I'm not an expert on oaks, so I don't know if there is anything specific about them. Germination is more about soil temp and moisture, not air temp and humidity. After trees have germinated, I like to shoot for the mid 70s with about 80% RH. That is pretty hard to achieve with evaporative type humidifiers, but anything over 60% RH is pretty good. Even with my whole house atomizing humidifier I'm around 75% RH at 75 degrees.
Keep in mind that while this might be optimal, the trees will still grow well under lower humidity levels.
Good Luck,
Jack
 
I was poking around on Amazon today and stumbled across a 10 pack of Mylar survival blankets for $4 with free shipping. I decided to order them and try them out in my indoor greenhouses. I have noticed that plants near the edges of the lights tend to bend toward the center. So far, I just rotate the cell every few days. I wonder if the reflection from the Mylar will be enough to prevent this bending.
 
beau_cephus;739407 said:
I've finished my grow room. It's been up and going for about a week now. l'm already getting some germination on some chinkapins, SWO,Chinese Chestnuts and Swamp Chestnut acorns. I'm thinking the sunfilm around the sides is helping, as I have the light several feet above the acorns. Getting some new growth on the apple tree seedlings, bald cypress, and button bush that I started end of summer.
http://postimg.org/image/ebpq8oypj/
http://postimg.org/image/73e3jelyv/
Nice job. From the pictures, I'd say the only critique I'd have is the lighting. Those fluorescent lights are cool. Light energy diminishes with the distance squared. When using these kinds of lights, I like to keep them close to the plants. They are cool enough that a few inches is plenty. Since you have such a variety of plant sizes, I'd consider adding a second light. Then I'd put your tall plants under one light and those just germinating under the other. Adjust each light so it is a few inches above the tallest plant.
Good Luck,
Jack
 
I do several things for that:
1) Don't water too often.
2) Mosquito Dunks: http://www.lowes.com/pd_92460-1643-...uito&pl=1&currentURL=?Ntt=misquito&facetInfo=
- I uses these in 2 ways. First, I put a ring in the bottom of each greenhouse where the water collects. Second, when I plant each seed in cell, I take one of the dunks and break it in half. I rub the two halves together and cover the top of the cell with a little of the powder it makes.
3) Bug Zapper: I have a bug zapper on a timer. When my fluorescent lights go out, the bug zapper comes on. This attracts and kills any adults before they lay more eggs.
I'd say the biggest factor is making sure the mix dries out before watering again.
Thanks,
Jack
 
beau_cephus;742102 said:
Thanks Jack, I'll cut back on the watering. I've been keeping the soil moist by spraying every morning with a spray bottle.
I took your advice on getting the acorns closer to the shop light. Its has help with the germination and growth.
 
Just a word on my experience with humidifiers. As you can see in the previous posts, I've vented a whole house atomizing humidifier into my basement. This does a good job of keeping the basement humidity in general up over 50% at optimal temperatures but this is still a bit below desired levels. As you can see from some of the pictures, I also use small room sized humidifiers inside the greenhouses. When I did not have the whole house humidifier, I had to completely close the greenhouses and even then the room sized humidifiers struggled to keep the humidity at desired levels. Now, with the green houses open, they keep them at higher humidity levels than the open part of the basement.
Here is my take on the room sized humidifiers. Generally, they have to be the smaller less sophisticated ones that don't have a humistat and just run constantly. The ones with humistats generally don't go beyond about 30% RH or so which is optimal for general living. If you do have one with a humistat, if you are handy, you can simply remove the humistat and wire it directly so it never stops running.
I find a 1 gal humidifier is about the right size for these small greenhouses. It needs to be refilled once or twice a day. Larger ones don't need filled as often but take up more room inside the greenhouse so it is a trade off.
In general there are a couple types of humidifiers. I've used evaporative and atomizing. The evaporative style uses a filter that draws water from the base. A fan blows air across the filter evaporating the water. You see nothing coming from this type. Atomizing typically runs some kind of mechanical device spinning through the water sucking it up and aspirating it into the air. These generally don't use a filter.
The evaporating type don't put as much humidity into the air as fast and generally don't need to be refilled as often. Since the fan and motor are isolated from the water they tend to last longer. One down side is the filter. In the humid environment we are putting these in for plants, the filters tend to get mold and mildew quickly and need to be changed often. They are not inexpensive.
The atomizing type gets more humidity into the air faster. However, the water droplets can condense on equipment. Lights and such will get more corrosion when using these so you may get a few less years of use out of your lights but they are not expensive to replace. My experience has been that these units work better but don't last as long. How long the last may have something to do with the design of the individual unit, but in general, the motor gets more exposure to the moisture causing corrosion over time.
I just ordered 2 of the atomizing units. http://www.amazon.com/Vicks-V4500-FilterFree-Humidifier/dp/B000FFIYEE
I had one of these last year and I liked the way it performed, but when I tried to use it this year it was dead. I tore it apart and found the motor was corroded and locked up. So, I can't recommend it from a durability perspective.
I wont' be using the evaporative type any more. I just don't like the mold issue with the filters.
Thanks,
Jack
 
Rally1148;744257 said:
Do/have you run any type of air filter in your basement? I know that what we are growing is different than that which most grow stores are geared towards, but I always see filters advertised.
I've got a room in my basement that I've "converted" by hanging shower curtains over the spaces that let air out (it's kind of like an room separated by a bar type floor plan... difficult to explain). I've got a fan going in there on low to give some air movement, but with it being in the 80's and my humidity in the 50's, I worry about mold/mildew.
Any experience with them?
 
No, I'm not using any air filters. That is actually not very high humidity. Remember RH is a function of temperature. If you increase the temperature to 70 degrees without changing your humidification, your RH will drop significantly.
 
beau_cephus;744316 said:
Im using an atomizing humidifier in my 4x4x4 greenhouse and it keeps the RH around 70-80% depending if the space heater is running. Its been warm in alabama this past week so I haven't had to us the space heater the past few days. My RH has increased 10% during this period.
I've had good growth on my chinkapins and swamp chestnut oaks after moving them closer to the light. I move them down from the light this morning after watering.
I bought a hanging insect strip and it has taken care of the gnats.
http://www.hotshot.com/products-and-solutions/all-products/no-pest-strip.aspx
Below is the humidifier that I fill up once in the morning and once in the evening.

image hosting 10mb limit
The no pest strip is hanging above my grow light.

upload pic

Very nice!
 
StevenJ;744429 said:
So what color temperatures are you employing?
The above quote is not too reliable in terms of generating early growth. If lumen strength is equal, higher color K temps will generated more vegetative growth (vs. flowering/blooming). So it would be better to go with higher color temp bulbs.
Steve,
If you dig into the details, most color rating are averages across a wide range. They have little meaning. For example a bulb rated at 3K may have little in the 3K range and a lot above and below averaging to about 3K.
Only when you get into the very expensive plant lights do you start to get lights with a spectrum chart showing how much it is actually putting out at specific frequencies (wavelengths).
Because the inexpensive bulbs I use are really a guessing game, I mix and choose bulbs from a wide range of frequencies. In reality what you really want for the life cycle of a plant is full spectrum which is sunlight. To my way of thinking light wavelength has a very minor impact on the overall development of a tree that will be indoors for tiny fraction of its life. It is much more important to get more lumens close to the plant without heating it than to have a specific wavelength of light.
I'm not doubting that specific wavelengths of light benefit particular plants more at particular stages of development. My argument is that for our purposes starting trees a little early to fight cabin fever over the winter months the cost is very high for a minimal benefit. If one wants to select low cost bulbs with a higher K rating, I'd have no issue with that, but I'd also doubt it would make much difference.
Thanks,
Jack
 
Top