yoderjac
5 year old buck +
When I was younger, I loved to use climbing and hang-on type stands, but as I'm getting a bit older, I feel safer in ladder stands. I hope there will come a point when I'm still hunting but don't feel comfortable in a ladder stand. When I was younger, my primary focus was harvesting mature bucks, but over time, my focus has shifted to bringing youngsters into the sport.
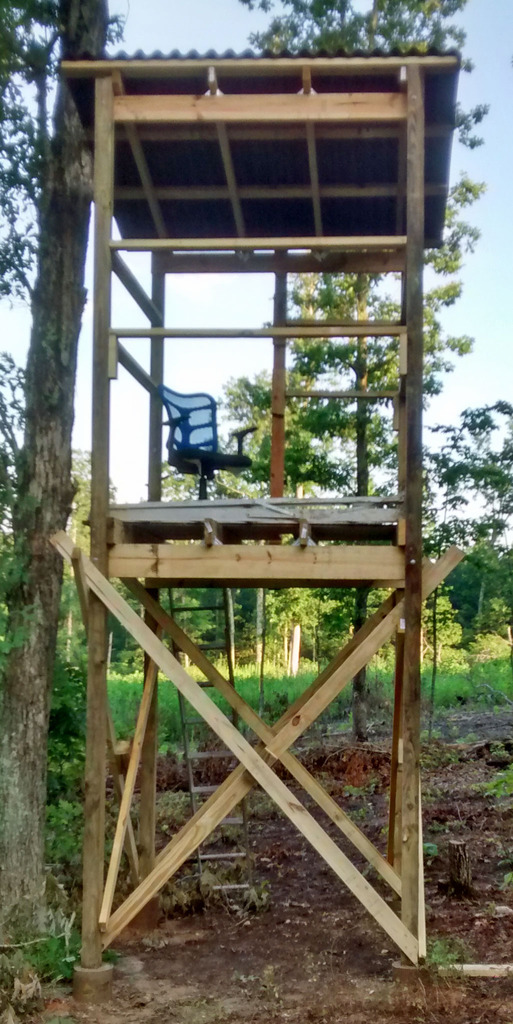
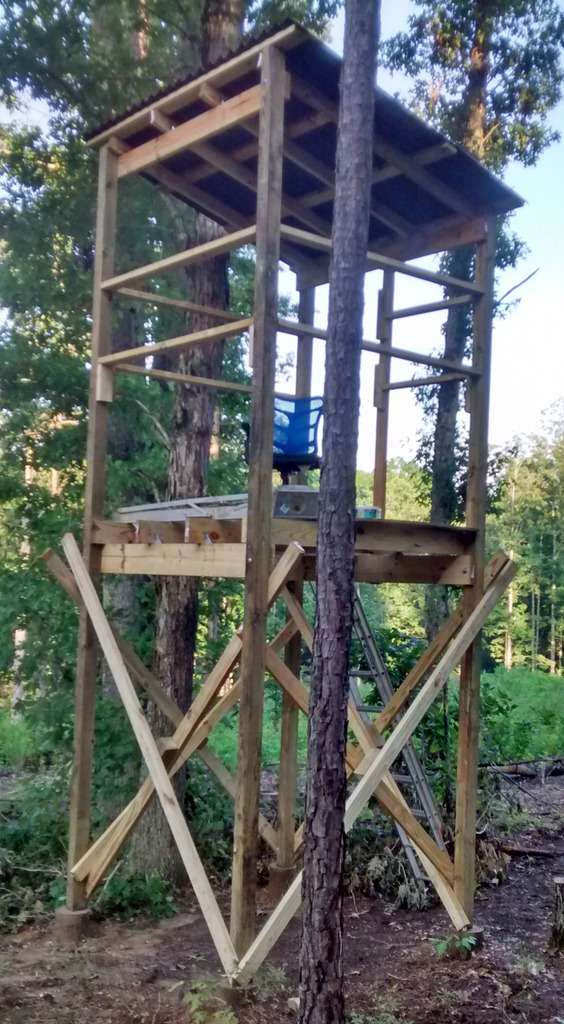
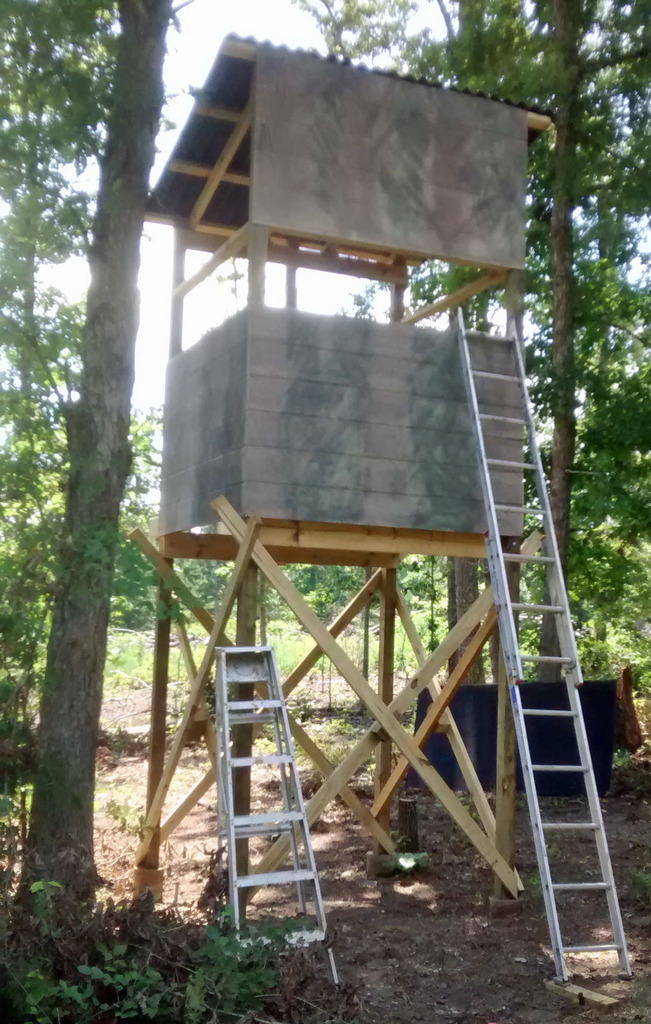
So, I started building some elevated box blinds. My first few were focused on supporting kids. I made them 6'x8' and 8'x8'. I like the elevation because it takes some of the scent issues out of the equation when dealing with kid and I like both the safety enhancement of shooting at a downward angle and a low exit wound makes for easier blood trailing. I built these with stairs so that I could take young kids as well as older ones. 6'x8' and 8'x8' boxes allow for plenty of space to maneuver to help a kid. The down side is the expense. If you search some of the other threads, you'll find some pictures of these stands.
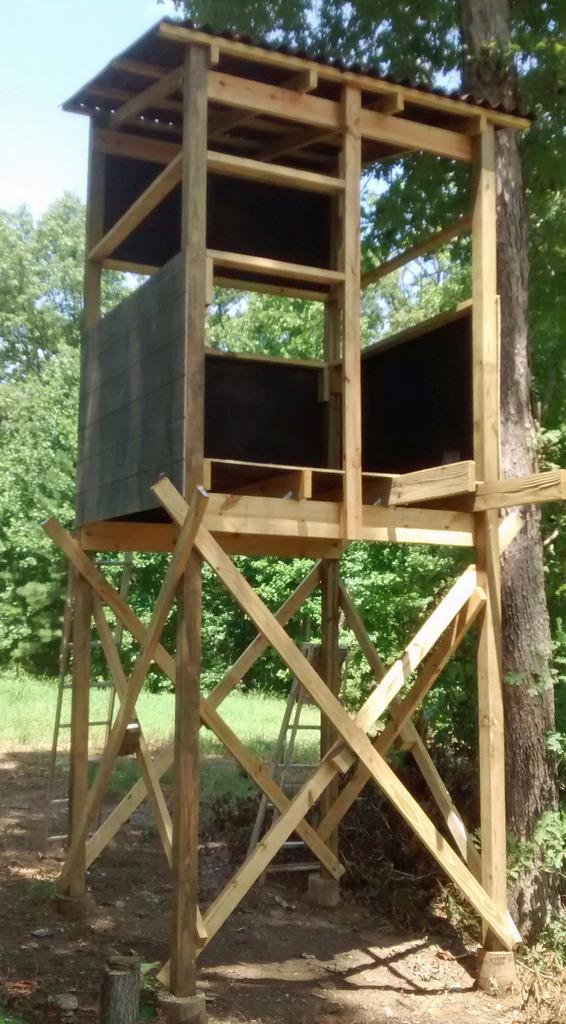
I now have enough of these 2-man elevated stands to take kids. I'm now shifting focus to building them for my later years of hunting. I've decided that 6'x6' is sufficient for me and it significantly reduces cost. I've also made a couple templates to allow me to construct these more quickly and by myself.
Template 1: Ground Template
The ground template is made from aluminum angle iron and some corner brackets. It is used to mark the positions for footers. I simply lay it on the ground. I then adjust the orientation considering where I will eventually put windows and the door and angle the stand just how I want it give the vegetation and terrain. Once positioned, I put safety flags at each corner. The Ground Template is designed so the flags end up right in the middle of each footer.
Step 1: Footers
I spray some orange marking paint where each flag pin enters the ground. I then use my tractor auger to auger a hole about 2' deep. I then use 8" round cement forms in each hole. I cut them and only place them part way in the hole. I then pound rebar into the hole so it is just below the top of the form. I place the ground template back on top of the forms and then use a level. I adjust the forms so the ground template sitting on top is level in all directions. It doesn't have to be perfect because the corner posts can always be cut. I then fill the forms with cement and allow it to cure.
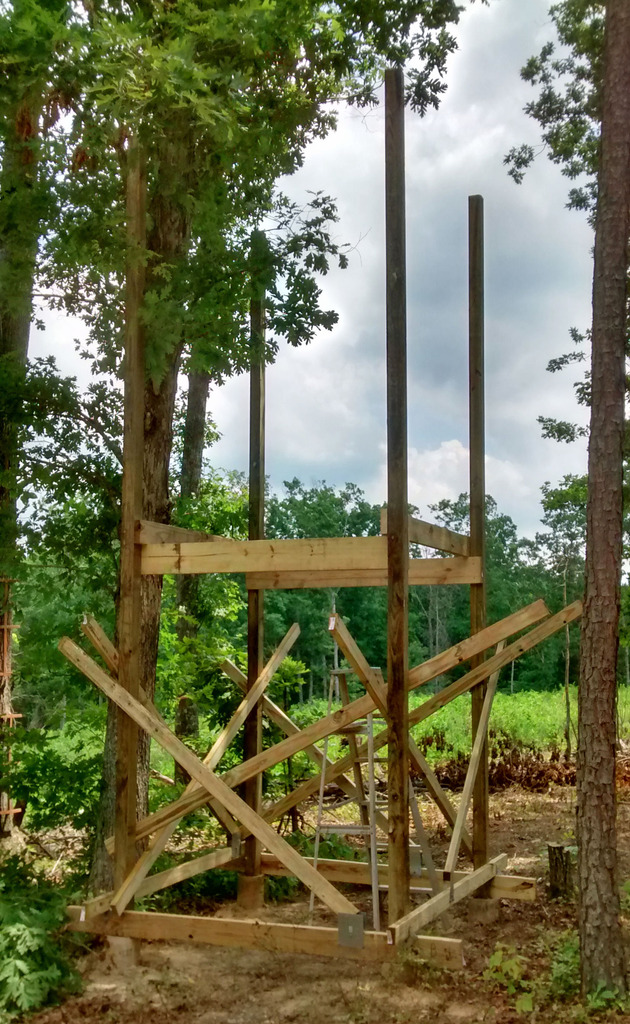
Template 2: Post Holder Template.
This consists two 8' 2x6s and 2 8' 2x4s. The 2x6s sit on the cement forms parallel to each other on the 2" side. I use hurricane ties set so the insides of the ties are exactly 6' apart. The 2x4s sit on top of the 2x6s in the hurricane ties and are set so the 2x6s are exactly 6' apart. The Post Holder Template then has mending plates sticking up from the sides of the 2x6 about 3/4 of the way between the hurricane ties. A 2x4 is then set on top of the 2x6 between the plates. It is elevated enough so it will swivel and a single 3" screw goes through one plate, the 2x4, and then the other plate. This allows the 2x4 to swivel up. You'll see this if you look closely at the picture. These plates and swiveling 2x4s are place on the other sides where needed.
Step 2: Setting the corner posts.
I first start decking screws through the 2x6 and 2x4 of the post holder template at the corner. I then lift the 4x4 post onto the footer. I slide it tight into the corner and then finish screwing in the screws thorough the template. This holds the post in place long enough for me to level and secure it. I then use a level to ensure the post is level in one direction. I swivel the 2x4 held by the mending plates up about 5' and screw it into the level 4x4. I then level it in the other direction and repeat the process with the 2x4 tied to the mending plates on the other side. The result is a corner post standing straight. I then move to the second post. This time I only need to use one 2x4 tied to a mending plate because I can tie the 2x4 brace to the first post in the other direction. I work my way around until all 4 posts are set and held in place by each other and the template.
Step 3: Installing Floor Headers and Slide Floor Joists.
I used 2x8s for the floor headers. I first measure up from the cement to where I want the bottom of my floor header and partially screw in a decking screw. I then place one end of my 6' 2x8 on the screw, place a level on it, and raise the other end until it is level. I then screw that end in with two decking screws (one near the top and one near the bottom of the 2x8) and then do the same on the other side removing the support screw. Because these headers will support the weight of everything above, I then drill and screw 1/2" x 6" carriage bolts and nuts in the center between the decking screws. Once I have the first header board in place, I next install the side floor joists. I place one end of the floor joist on the header, place a level on it, and raise the other end until level and screw it into the 4x4 with decking screws. I then screw in the other side with decking screws as well. I repeat the process with the other side floor joist. I then slide the other header board up under the side joists making sure it is tight and screw it in. It helps to place a support screw on one side so it is almost level before screwing in the other end. I use the same screw/carriage bolt configuration as with the other header.
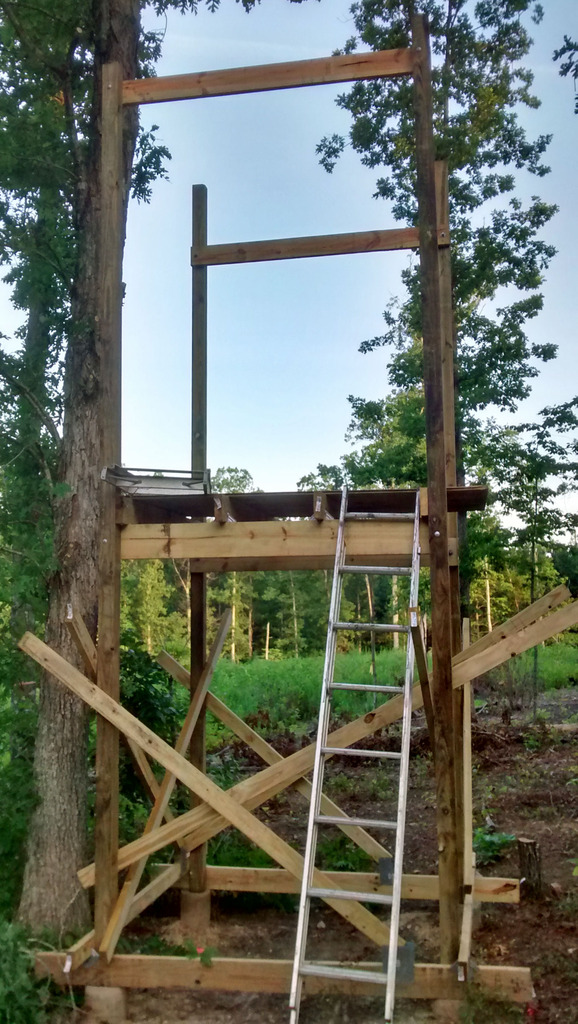
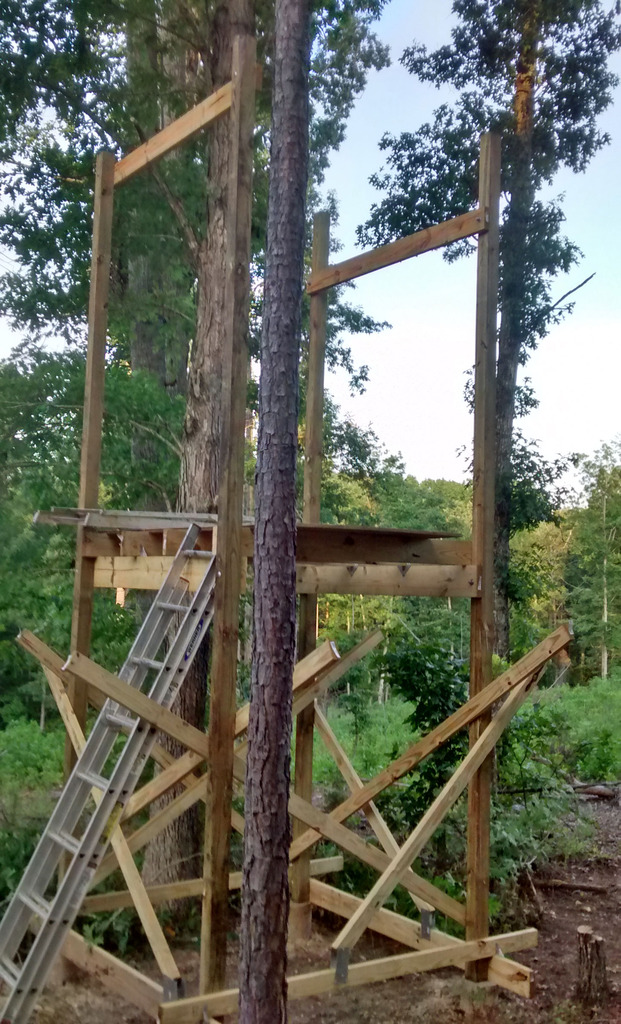
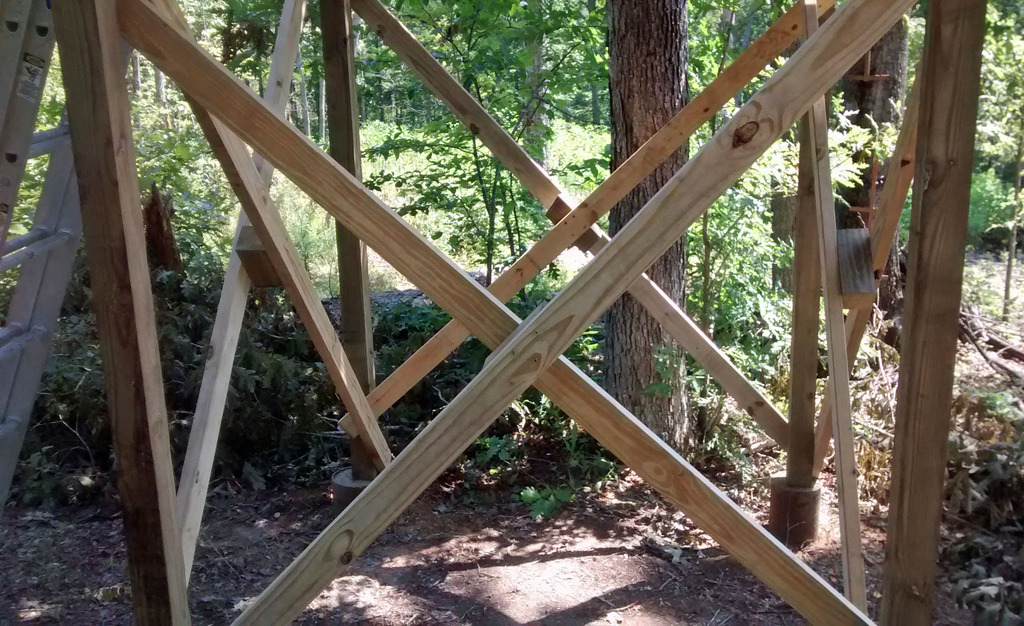
That is all the further I got today. In fact I haven't actually added the bolts yet. I'd do that next time. Here is a picture of the stand so far. Note that the post holder template will eventually be removed and replaced by cross braces.
I'll update this tread as things progress.
Thanks,
Jack
So, I started building some elevated box blinds. My first few were focused on supporting kids. I made them 6'x8' and 8'x8'. I like the elevation because it takes some of the scent issues out of the equation when dealing with kid and I like both the safety enhancement of shooting at a downward angle and a low exit wound makes for easier blood trailing. I built these with stairs so that I could take young kids as well as older ones. 6'x8' and 8'x8' boxes allow for plenty of space to maneuver to help a kid. The down side is the expense. If you search some of the other threads, you'll find some pictures of these stands.
I now have enough of these 2-man elevated stands to take kids. I'm now shifting focus to building them for my later years of hunting. I've decided that 6'x6' is sufficient for me and it significantly reduces cost. I've also made a couple templates to allow me to construct these more quickly and by myself.
Template 1: Ground Template
The ground template is made from aluminum angle iron and some corner brackets. It is used to mark the positions for footers. I simply lay it on the ground. I then adjust the orientation considering where I will eventually put windows and the door and angle the stand just how I want it give the vegetation and terrain. Once positioned, I put safety flags at each corner. The Ground Template is designed so the flags end up right in the middle of each footer.
Step 1: Footers
I spray some orange marking paint where each flag pin enters the ground. I then use my tractor auger to auger a hole about 2' deep. I then use 8" round cement forms in each hole. I cut them and only place them part way in the hole. I then pound rebar into the hole so it is just below the top of the form. I place the ground template back on top of the forms and then use a level. I adjust the forms so the ground template sitting on top is level in all directions. It doesn't have to be perfect because the corner posts can always be cut. I then fill the forms with cement and allow it to cure.
Template 2: Post Holder Template.
This consists two 8' 2x6s and 2 8' 2x4s. The 2x6s sit on the cement forms parallel to each other on the 2" side. I use hurricane ties set so the insides of the ties are exactly 6' apart. The 2x4s sit on top of the 2x6s in the hurricane ties and are set so the 2x6s are exactly 6' apart. The Post Holder Template then has mending plates sticking up from the sides of the 2x6 about 3/4 of the way between the hurricane ties. A 2x4 is then set on top of the 2x6 between the plates. It is elevated enough so it will swivel and a single 3" screw goes through one plate, the 2x4, and then the other plate. This allows the 2x4 to swivel up. You'll see this if you look closely at the picture. These plates and swiveling 2x4s are place on the other sides where needed.
Step 2: Setting the corner posts.
I first start decking screws through the 2x6 and 2x4 of the post holder template at the corner. I then lift the 4x4 post onto the footer. I slide it tight into the corner and then finish screwing in the screws thorough the template. This holds the post in place long enough for me to level and secure it. I then use a level to ensure the post is level in one direction. I swivel the 2x4 held by the mending plates up about 5' and screw it into the level 4x4. I then level it in the other direction and repeat the process with the 2x4 tied to the mending plates on the other side. The result is a corner post standing straight. I then move to the second post. This time I only need to use one 2x4 tied to a mending plate because I can tie the 2x4 brace to the first post in the other direction. I work my way around until all 4 posts are set and held in place by each other and the template.
Step 3: Installing Floor Headers and Slide Floor Joists.
I used 2x8s for the floor headers. I first measure up from the cement to where I want the bottom of my floor header and partially screw in a decking screw. I then place one end of my 6' 2x8 on the screw, place a level on it, and raise the other end until it is level. I then screw that end in with two decking screws (one near the top and one near the bottom of the 2x8) and then do the same on the other side removing the support screw. Because these headers will support the weight of everything above, I then drill and screw 1/2" x 6" carriage bolts and nuts in the center between the decking screws. Once I have the first header board in place, I next install the side floor joists. I place one end of the floor joist on the header, place a level on it, and raise the other end until level and screw it into the 4x4 with decking screws. I then screw in the other side with decking screws as well. I repeat the process with the other side floor joist. I then slide the other header board up under the side joists making sure it is tight and screw it in. It helps to place a support screw on one side so it is almost level before screwing in the other end. I use the same screw/carriage bolt configuration as with the other header.
That is all the further I got today. In fact I haven't actually added the bolts yet. I'd do that next time. Here is a picture of the stand so far. Note that the post holder template will eventually be removed and replaced by cross braces.
I'll update this tread as things progress.
Thanks,
Jack
Last edited: