Bill's knife build

tooln

5 year old buck +
Bill has contacted me and wants me to make him a knife. When I make a knife for anyone they have the option of getting updates along the way. Bill has agreed to share his knife build here, some may find it boring, other may find it interesting. It will be fillet style blade made from 1/8" thick 1095 high carbon steel. I start by drawing out the profile of the blade, after it is approved by the customer I transfer it to cardstock and glue it to the steel blank. The nest step will be cutting the blank to shape. 20211231_094554 resize.jpg20211231_120742 resize.jpg
 
Bill has contacted me and wants me to make him a knife. When I make a knife for anyone they have the option of getting updates along the way. Bill has agreed to share his knife build here, some may find it boring, other may find it interesting. It will be fillet style blade made from 1/8" thick 1095 high carbon steel. I start by drawing out the profile of the blade, after it is approved by the customer I transfer it to cardstock and glue it to the steel blank. The nest step will be cutting the blank to shape. View attachment 39738View attachment 39739
Following!
 
Looking forward to this ... don't spare any of the boring details :emoji_wink: :emoji_thumbsup:
 
Looking forward to this ... don't spare any of the boring details :emoji_wink: :emoji_thumbsup:
Trust me some are really boring.
 
fillet style.
To expand on that. It's not going to be a bendy flexible knife. It's purpose is to cut Tuna..... once I learn to catch them.:emoji_wink:

Bendy flexi doesn't work well on fish that big.
 
Today I rough cut the blade. 20220101_102616r.jpg

Then I refined the profile. 20220101_110046r.jpg

Getting ready to grind the bevel first thing I do is scribe a line down the center of the blade. This way the cutting edge will be centered. You may not be able to see the scribe line but trust me it's there. 20220101_110515r.jpg
 
Was able to get the bevels ground in today. Getting close to heat treat and tempering. It may be a few days before I get to this as I have been putting off some updates to my tempering oven. I started on them this AM and need to finish before I use it again. I can do some prep work for the handle while waiting for parts to finish the upgrade.

20220101_135654r.jpg
 
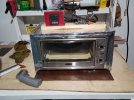
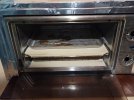
Since I'm working on my tempering oven maybe I'll explain a little abut heat treating and tempering, what it does and why I do it. I use 1095 high carbon steel to make knives. There are many steel's a person can use but 1095 makes a good strong blade that holds an edge. I also look at keeping cost in line and availability which lately has become hard. 1095 like any other steel is malleable which isn't good for a knife. When steel is heat treated it become very hard but also very brittle, so tempering comes into play removing the brittleness but the steel still remains hard. Without getting technical heat treating involve heating the steel to the correct temperature and then cooling (quenching & tempering) at a controlled rate. 1095 is high carbon so it is magnetic, in heat treating as the steel get red hot it becomes non magnetic. So I watch for the color of the blade and it becoming non magnetic to know when its at the right temperature to have a proper heat treat. The blade is then put into oil that is preheated (quenched) and after the quench it goes into the tempering oven for 2.5 hours. In tempering you need to maintain the temperature at close tolerances. Some temper their knives in a regular household oven. I have 2 problems with that. 1 the wife wouldn't let me do it and 2nd household ovens doesn't hold temperature very accurately. What I did was modify an everyday toaster oven. I looked for and found a used toaster oven that had the right kind of heating element. I removed all the stock controls and built my own temperature control sytem capable of running a PID loop. Working in the dairy industry as long as I did I had plenty of knowledge making and programming this. The toaster oven when I first got it with stock controls had a 75 degree swing at 450 degrees in an hours time, this wouldn't do to properly temper a blade. After I was done modifying I am able to hold a 2 degree tolerance over a 3 hour period at 575 degrees. To help make the oven more efficient I insulated to outer shell. I also had an old pizza stone that hasn't been used in some time so I cut it up and placed pieces in the oven to help hold heat. The update to my oven is a new longer thermocouple to make it a little more accurate, I also put a second layer on insulation on as the first was getting beat up from all the use. I temper my knives in the oven @ 450 degrees for 2.5 hours, then I turn the oven off and let them cool in the oven which takes another 1.5-2 hours.
 

Attachments

  • 20220102_100711.jpg
    20220102_100711.jpg
    343.9 KB · Views: 29
  • 20220102_100650.jpg
    20220102_100650.jpg
    275.9 KB · Views: 28
Last edited:
Cool thread like seeing the progress
 
A small detail but one I think is important. Where the blade is necked down for the handle there shouldn't be a square corner, it needs to have a radius. The white arrow is not radiused yet the yellow arrow is. The square corner is a weak point in any material, a radius even a very small one makes a big difference in strength. Any striking with the knife causes a vibration the travels though the entire blade. That square corner is a weak spot. Try this at home, take a piece of paper and cut a square corner in it, tug the edges of the paper and it will tear on that square corner every time. Make the same cut but with a small radius in the corner it will tear there but it take more to do it. Again a very small detail that you'll never see and most don't know about it. I tried getting a good pic but this was the best the phone camera would focus on. Inked20220102_132714.jpg
 
Today I did some prep work for the handle. It's going to be a hidden tang made from Red Oak with a leather spacer/liner, brass pins & a brass guard/bolster. Getting the brass guard to fit the tang is very time consuming. Drill sone 1/8" holes and then file out between the holes them file to final size for a tight fit. 1 or 2 many strokes of the file and it's scrap. I also needed to build a larger quench tank as the gallon can I use now isn't tall enough for this blade. I'll now be able to quench up to 20". I went to the local scrap yard and got some SS tubing and welded it together. 20220103_135258.jpg20220103_143045.jpg
 
I've got 2 of Tooln's knives. One of them sits in the door of my truck and has been beat to hell. It's been through several deer, a ton of fish, quite a few ducks, skinned critters, hammered through bone, and even killed a rattlesnake. It's handled everything better than expected, been one of the best knives I've ever owned. This one will turn out no different.
 
When you’re not making knives you could certainly hire yourself out to the hot rod guys. Those stainless welds are impressive. Stainless exhaust systems are not cheap…
 
When you’re not making knives you could certainly hire yourself out to the hot rod guys. Those stainless welds are impressive. Stainless exhaust systems are not cheap…
I worked in the dairy industry as a mechanic for 30+ years. I have welded thousands of pipe joints together. In my area there are so many job shops that do nothing but SS line installs. Welds on product lines have to be perfect on the inside because of product contact. A purged weld looks better on the inside of the pipe than it does on the outside. I've made a few exhaust systems for bikes over the years. This pic doesn't do the bead justice. 20220104_074757.jpg
 
Today I heat-treated Bill's blade. I'm not the best at making videos but I think you'll get the idea of the process. What the video doesn't show is me thermo- cycling the blade. I get the blade red hot and then air cool it. I do this 3 times. I hope you enjoy the video.

 
Looks like a fun hobby!
 
Looks like a fun hobby!
It is fun, challenging at times. More than anything I enjoy making them. Also keeps me busy during retirement.
 
I’m 5 days into retirement…and looking forward to dusting off the old woodworking tools, and starting my habitat projects.
 
Today I did 1 of the 2 testing do on each and every knife I make. This is to show the new owner that the knife he's getting is good and strong. Enjoy the show.

 
Top