Stairway to heaven

Apple Junkie

5 year old buck +
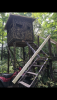
I must be getting old since finding a nice dry, warm spot to sit is sounding a lot better than breaking into a drenching sweat climbing the mountain, only to be freezing my azz off 30 minutes later as the sun starts to crest the horizon. Hence… a cozy raised blind is on the drawing boards. Phase one is complete. The platform is 10’ high, and has 5’ x 4’ base. Next comes the enclosed blind… but that chapter has yet to be written. Stay tuned. 08.jpg
 
Last edited:
I am in the process of replacing all the treated lumber access ladders to my stands with sets of treated lumber stairs. I try to do one or two new stairs a year and have four stands left. 26 years ago when I first built my stands, myself and all my hunters could easily climb the ladders to access them. Now we are all older and having a set of stairs versus a ladder just makes getting into the stands so much easier and safer. Both of my knees have severe osteoarthritis, so this is primarily done for my benefit. I see you have a set of hand rails on your stairs which is a great addition. I wish I had originally built all stairs as the cost would have been so much cheaper back then.
Just something to keep in mind as hopefully we will all be getting older. Plan long term!
 
Last edited:
From one older guy to another, I can say from first hand experience, you are going to love those stairs as opposed to a ladder. I use all stairs on ours and they make access a lot easier. Good luck and be sure to share the build.
 
Nice hand rails! I prefer the stairs as well, but ladders are so much quicker to build! I had a buddy out hunt my place this year that had never hunted from an enclosed tower blind before. He told me that he had to get one of his own! So that is on the summertime project list. Good luck with the rest of your build.
 
Looking good, just one observation. It does not look like the feet are set in the ground. Guessing cause the ground is frozen.
But it is a step I would not skip personally.

In the past as opposed to digging holes cause it can be a pain to get them right once already up.
I just pounded 6ft Flat sided T posts in the ground, an used full length bolts to secure the T post an 4x4 to the ground.

Gets awful windy here.
 
It looks great so far!
Every year I say I'm going to finally put one up but get distracted with a dozen other small projects. I want one for those drizzly and crazy cold days....and for when I finally have grandkids to spoil rotten. The stairs are a nice touch.
 
Great looking start, A.J. !! Stairs are A-1 ....... and rails are perfect. Keep us up to date on your build.

I should get to building one of these enclosed stands for myself too. Open ladder stands are no fun anymore in crappy weather. The "tough it out" days are fast disappearing !!!
 
Posted just so I can follow your progress. I Love the great start!
 
I did the same thing a few years ago. Although I did my stairs with a landing. This picture was taken prior to it being painted, and the final touches added, but I sure oove the enclosed heated stand.
 

Attachments

  • 43C179CC-AB89-49D9-ABDB-5E134DFDB228.png
    43C179CC-AB89-49D9-ABDB-5E134DFDB228.png
    2 MB · Views: 110
Good looking platform,I too use the elevators,The cheapest I can find is sportsmans guide.I am making some platforms like yours to put my redneck gillie blind on.My box blind was on 6ft tower and blew over twice.I set a post on the north and south side of platform and bolted to frame of platform no shake no tip over but can be cut and move blind.
 
Nice looking blind Wandering, that's just what I had in mind. I hope mine turns out half as good as that one!

I hope I didn't underestimate the impact of wind Buckdeer. TBT mentioned it too, so I will keep an eye on that once I get some walls up. Glad you figured out a fix.
 
A.J. - It must be in a good, proven spot. I see the remains of an older tree stand behind the new platform to the left in the pic. Those tree-mounted types get shaky after a bit - wind swaying the trees, etc. I used to have several. :emoji_fearful:

Thought of renting it out for a day or 2 ?? :emoji_grin:
 
When building stands on my land 26 years ago there were two nice oak trees in which I built 4'x4' box blinds . Sadly, both oak trees succumbed to oak wilt maybe 10 to 12 years ago and eventually fell to the ground. I was able to salvage the two box blinds from the fallen trees. The original blind I built in an oak tree 37 years ago is still standing but I just saw the roof collapsed this season. Lesson learned, don't build in oak or other trees.
 
Very observant Bows.... yeah, a fair number of bucks have been taken from this spot. As for renting out the blind, that gives new meaning to "Air B&B".

There are never any guarantees when it comes to blinds JFK... I guess if this one was to last 37 years, it will be someones else's problem to deal with. Personally, I'd like to get 10 years out of it before having to re-build.
 
A.J. - You serve BREAKFAST in that tree stand ??? !!! ^^^^^^ Sign me up. That's hunting I could suffer through !!! :emoji_grin:
 
Last winter I built a platform for a raised blind. Phase 2 started over the summer when I built the walls and roof rafters at home as time permitted. This fall, I transported them to the hunting camp to haul into place and complete the project. Honestly, this was a slow process as this was a one-man, no heavy equipment, endeavor. Step one was get my “freight elevator” in place and get the first wall up, mounted, and braced.
09 raising first side wall.jpg11 wall bracing.jpg
 
After that, the second, third, and final wall were raised and secured.

13 east wall raised.jpg15 north wall ready for raising.jpg16 north wall up, raising west wall.jpg
 
The rafters really tied things together securely, and the addition of a roof finally kept everything dry inside. The challenge was adding the roof without actually getting on top of the roof – I added “2x2 “tabs” which were pre-attached to the roof sections, then secured to the rafters from inside the blind to hold the roof on.20 roof on from front.jpg
 
Last edited:
The final step was to add 2-section, sliding windows cut from plexiglass. These were mounted in guides so they can be lifted completely out, or, slid back to take a shot. All done just in time as the wind, rain, and cold arrives here in Western NY.23 finished south to logging lane view.jpg24 finished north to creek view.jpg
 
Last edited:
Great step by step pictures of your build. Ingenious how you got the side sections up all by yourself with a rope. The only thing I would have done different is have the pitch of the roof drain towards the back of the stand. As it sits, everything will come down right on the landing in front of your door. Freezing rain and ice can make that area very slippery. Make sure of your footing if it is wet.
I really liked the way it blended in with the surroundings in one of your pics. In no time at all, the deer will accept this as part of the landscape.
 
Top