New Barn Build - 25x36 Pole Barn

Natty Bumppo

5 year old buck +
Been a while since I posted a thread...thought I'd share some pics of my new barn going up.

My wife and I bought our house back in 2001, and since then I have been wanting to build a nice barn/workshop out behind the house. We did a solar array on our house last fall and because of a 30% federal tax credit on that project we got a fairly large check back from this spring....so we finally decided to go for it.

A neighbor and friend of mine who owns a contracting company came in and did the site work for me...we had to remove an old 14x18 cement pad and the top soil. I then had another friend of mine who owns a landscaping company come in a drill 16 18" holes 4' down. We live on top of a mountain and have fairly rocky clay soil. The estimate was 3 days and around $1500. The crew was here for an hour and a half...cost me $200. Only one hole did we have to pull a massive boulder with my backhoe.
IMG_3438.JPG


To set the poles in the ground I knew I did not want any wood to soil contact. I found a product call Perma-Column....they are 5' pre-cast 6x6 cement piers with an integral steel plate. I poured a cement footer in the bottom of each hole, assembled the columns to the 6x6 posts, and then brought them to the site with my forks.

IMG_3445.JPG
IMG_3440.JPG

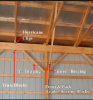
I then had some friends help me set each post in the ground and backfilled with about 2 to 3' of cement and then dirt on top. Braced them up and then installed purlins and the top plate.

IMG_3446.JPG IMG_3453.JPG
 
I've seen many guys who build pole barns simply bolt on the top plate to the 6x6's. Seems like notching the 6x6's and then bolting on the double 2x12's would allow the weight of the roof to be carried by the posts instead of a handful of bolts. I'm sure bolts are fine, but I decided to go through the extra work to notch the posts. IMG_3455.JPG


IMG_3454.JPG

I used PT 2x12's for the lower skirt board and nailed it on using stainless steel 3" split drive anchors.

IMG_3456.JPG

Searching on-line for trusses I found a wholesale truss manufacturer in Sprinfield, MA who had 12 25' foot attic trusses listed as "excess inventory." They sold those to me for $100 a piece and the made me 7 more at full price ($200). I used my JD 990 to bring the trusses into position....(that's not me driving....my buddy with the contracting company).

IMG_3457.JPG
IMG_3476.JPG
 
To set the trusses my buddy fabricated a steel jig for his mini-excavator. We would strap the rafter side of a truss to the jig and then he would carefully raise it into position. Took about a little over a day to set the 19 trusses.
IMG_3477.JPG
IMG_3461.JPG IMG_3469.JPG IMG_3478.JPGIMG_3479.JPG
 
I used some 4x6 rough sawn timbers for corners braces. I lagged them in with 10" lags. Then we brought in some stone in preparation for concrete.

IMG_3482.JPG IMG_3483.JPG

And here it is as it sits today. I'm hoping to do some final grading this week, pack the stone down, and have a cement pad poured by Friday. Next will be a barn red metal roof and board and batten siding and some garage doors all before the snow flies.

I'd appreciate any thoughts if somebody sees a glaring problem with the build. I only have braces in the corners. I wasn't sure if that was adequate or if I should add a brace between every upright 6x6.

IMG_3480.JPG

IMG_3484.JPG
 
Looks great to me!

Not sure if you need it in MA but it n MO a vapor barrier between the stone and the poured concrete is a must. Otherwise the humidity causes puddles to form on the floor in the summer. My pole barn (built before me) doesn't have it. I swear gold fish could live on the floor in the heat of summer.
 
whats the reasoning for the staggered poles on one side and not on the other? one side has them in twos and the others are evenly spaced. Not the gable end which is the door. :)

nice trusses too. you will be able to utilize that space!
 
the only thing I see missing are the knee braces and possibly uplift hangers for the trusses. The code in my area calls for each of those to be installed. Basically a secondary connection between the truss and the header column. Don't forget about the rat guard on the bottom of the walls. If you are getting it inspected, my gut is telling me they are going to ding you on either the uplift hangers or the knee braces. But....... codes are different.

Looks great by the way! That's a big pitch! wow!
 
whats the reasoning for the staggered poles on one side and not on the other? one side has them in twos and the others are evenly spaced. Not the gable end which is the door. :)

nice trusses too. you will be able to utilize that space!

I'm guessing doors on that side of the building as well.
 
Great looking build. Very gratifying when you can do most of it yourself.

Keep us updated with progress pictures. Love to watch it come together.

-John
 
Looks great to me!

Not sure if you need it in MA but it n MO a vapor barrier between the stone and the poured concrete is a must. Otherwise the humidity causes puddles to form on the floor in the summer. My pole barn (built before me) doesn't have it. I swear gold fish could live on the floor in the heat of summer.

You bet Bill. Going to put down plastic on the stone and then pour the pad.
 
whats the reasoning for the staggered poles on one side and not on the other? one side has them in twos and the others are evenly spaced. Not the gable end which is the door. :)

nice trusses too. you will be able to utilize that space!

Yes....two 12x8 garage doors on that side and then a big 10x10 door on that gable end.
 
the only thing I see missing are the knee braces and possibly uplift hangers for the trusses. The code in my area calls for each of those to be installed. Basically a secondary connection between the truss and the header column. Don't forget about the rat guard on the bottom of the walls. If you are getting it inspected, my gut is telling me they are going to ding you on either the uplift hangers or the knee braces. But....... codes are different.

Looks great by the way! That's a big pitch! wow!

The uplift anchors (hurricane ties) are in place....I think maybe you just can't see them in any of the pics.

Not sure what you mean about knee braces? Where should these go?

Thanks.
 
Great looking build. Very gratifying when you can do most of it yourself.

Keep us updated with progress pictures. Love to watch it come together.

-John

Thanks John.
 
The uplift anchors (hurricane ties) are in place....I think maybe you just can't see them in any of the pics.

Not sure what you mean about knee braces? Where should these go?

Thanks.
Knee braces would be diagonal between the bottom of the truss to the posts. Our sheds have them, but I don't think they're absolutely necessary. They're extra strength against shifting. Great looking build- you will pat yourself on the back big time for putting that style of trusses in, even if it was an accident! :emoji_thumbsup:Are you running electric, water and/or drainage in the floor of the building? If you're not completely sure, make sure before concrete- a lot easer to put it in first rather than cut concrete later!
 
Natty ... looks great! Very resourceful on the rigging.
 
I would put some angle bracing in the trusses to keep it from shifting/racking. I always notch my post tops for the band boards, but have never bolted them, nails suffice, especially when sitting on the notch.
 
I'm suffering from "barn envy" big time! That is a great project and it looks wonderful. Nice job!
 
Just when you thought you seen it all!!! Concrete post bases! Awesome!
Looks great... I like your trusses with steep pitch and addict space
 
This describes what was stated earlier on knee bracing. Sorry I missed the hurricane clips.
 

Attachments

  • Capture.PNG
    Capture.PNG
    529.1 KB · Views: 122
Those concrete bases are the ticket,what i see most guys doing that use them nail 3-4 2x6 together that are staggered for the post and you don't get the splitting or warping.Looks great the snow should really fall off that roof
 
Top